When the summer heat rolls in, your air cooler becomes your most trusted companion, providing a refreshing escape from stifling temperatures. But what happens when that cool breeze turns warm, and you discover your air cooler’s water pump isn’t doing its job? A broken water pump can quickly turn your comfort device into a glorified fan. This comprehensive guide will walk you through diagnosing common issues, performing DIY repairs, and even replacing the water pump to get your air cooler back to optimal cooling performance.
Understanding Your Air Cooler’s Water Pump
At the heart of every evaporative air cooler is its water pump, a crucial component responsible for circulating water from the reservoir to the cooling pads. As hot, dry air passes through these water-saturated pads, it evaporates the water, which in turn cools the air before it’s blown into your room. Without a functioning water pump, this essential evaporative process cannot occur, leaving you with insufficient or no cooling.
Recognizing the signs of a faulty water pump is the first step toward a solution. Common indicators include:
- No water flow to the cooling pads, even when the cooler is on.
- Warm air being emitted instead of cool air.
- Unusual noises like grinding, rattling, or a persistent humming with no water movement.
- Visible leaks around the pump area, which could indicate a problem with its seal or connections.
|
Our Picks for the Best Air cooler in 2026
As an Amazon Associate I earn from qualifying purchases.
|
||
| Num | Product | Action |
|---|---|---|
| 1 | Evaporative Air Cooler - Swamp Cooler with 3L Water Tank, 3 Modes & 3 Speeds, Remote Control, 12H Timer, 50° Oscillating Portable Bladeless Cooling Tower Fan For Room Bedroom Office Mother's Day |

|
| 2 | Portable Air Conditioners, Swamp Cooler Portable AC Unit for Room, Windowless Cooling Fan That Blow Cold Air w/Remote 5L Tank 12 Speeds 9H Timer, Evaporative Air Cooler for Bedroom Garage (White) |
|
| 3 | LEVOIT Tower Fan for Bedroom, 90° Oscillating Standing Fan with 28dB Quiet for Sleep, 25ft/s Velocity, 12H Timer, 5 Speeds 4 Modes, Remoter, Bladeless Room Fan for Home, Office, Indoor, 36 inch, White |
|
| 4 | DREO Evaporative Air Swamp Cooler, 43" Cooling Fans that Blow Cold Air 2026 Upgraded, 80° Oscillating Floor Fan for Bedroom, Easy Cleaning, APP Control, Ice Packs, 4 Speeds & 4 Modes, 12H Timer, White |
|
| 5 | Midea 5,000 BTU EasyCool Small Window Air Conditioner - Cool up to 150 Sq. Ft. with Easy-to-Use Mechanical Controls and Reusable Filter, Perfect for Small Bedroom, Living Room, Home Office |
|
| 6 | Portable Air Conditioners, 3-IN-1 Evaporative Air Cooler,Cooling Fans that Blow Cold Air with 60° Oscillation,9H Timer,3 Modes & 12 Speeds, 8 Ice Packs, Windowless Portable AC for Room,Bedroom,Office |
|
| 7 | DREO Tower Fan for Bedroom, 43" Cooling Fans That Blow Cold Air 2026 Upgraded, Evaporative Air Cooler, Quiet 80° Oscillating Floor Fan, Easy Cleaning, APP Control, 4 Modes & 4 Speeds, 12H Timer, Black |
|
| 8 | 3-in-1 Portable Evaporative Air Cooler - 2000 CFM Swamp Cooler with 6.6-Gal Dual Tank & 4 Ice Packs, Remote Control, 12H Timer, Oscillating Cooling Fan for Large Room, Office, Mother's Day |
|
| 9 | DREO Tower Fan for Bedroom, 2026 Upgraded DC Motor, 28ft/s High Velocity, 20dB Ultra Quiet Standing Fan, 8 Speeds 4 Modes, 90° Oscillating Bladeless Fan for Indoors, Floor Fans with Remote, Black |
|
| 10 | Arctic Air Pure Chill 2.0 Evaporative Air Cooler by Ontel - Powerful, Quiet, Lightweight and Portable Space Cooler with Hydro-Chill Technology For Bedroom, Office, Living Room & More,Blue |
|
Why Do Air Cooler Water Pumps Break? Common Causes
Air cooler water pumps are generally robust, but several factors can lead to their malfunction. Understanding these common causes can help you pinpoint the problem and prevent future issues.
One of the most frequent culprits is clogs and mineral buildup. Over time, hard water deposits and airborne debris can accumulate around the pump’s impeller, preventing it from spinning freely and circulating water. This obstruction can severely reduce the pump’s efficiency or stop it completely.
Electrical issues are another significant cause. This could range from loose or disconnected wiring within the cooler to a completely burnt-out pump motor. A damaged fuse or a tripped circuit breaker can also cut off power to the entire unit, including the pump.
Furthermore, general wear and tear can lead to a pump’s demise. Like any mechanical part, components such as bearings can wear out, causing friction, noise, and eventual failure. Older pumps are naturally more susceptible to this kind of deterioration. Running the pump when the water tank is critically low, known as running dry, can also cause the pump to overheat and sustain damage, drastically shortening its lifespan.
Essential Tools and Safety Precautions
Before you begin any troubleshooting or repair work on your air cooler, gather the necessary tools. You’ll typically need:
- A screwdriver set (Phillips and flathead) for accessing internal components.
- Pliers for disconnecting hoses and securing clamps.
- A small brush or old toothbrush for cleaning delicate parts like the impeller.
- A cutter plier (if you need to cut zip ties securing wires).
- A mild detergent or a solution of white vinegar for descaling.
- New zip ties and hose clamps may be helpful for reassembly.
- And, of course, a replacement water pump if it’s determined that the old one is irreparable.
Safety is paramount. Always ensure the air cooler is unplugged from the power outlet before performing any maintenance or repair. Water and electricity are a dangerous combination, and neglecting this step can lead to severe electrical shock. If you are ever unsure about a step or dealing with complex electrical components, it is always best to consult a professional technician.
Step-by-Step Guide to Troubleshooting Your Air Cooler Water Pump
Diagnosing the problem with your water pump can often save you from unnecessary replacements. Follow these steps to systematically troubleshoot the issue:
1. Initial Checks (Before Opening the Unit)
Begin by performing simple, external checks. First, verify the power supply. Ensure the cooler is properly plugged into a functional outlet. Check the power cord for any visible damage. If the entire cooler isn’t turning on, inspect the electrical fuse or circuit breaker connected to the outlet; a tripped breaker or blown fuse can prevent any component from receiving power. Next, confirm the water level in the tank. The pump requires an adequate water supply to function; if the water level is too low, the pump will not be able to draw water. Finally, listen carefully for any pump sounds. A faint hum or vibration without water flow might indicate an obstruction, while a complete lack of sound usually points to an electrical issue or a completely failed motor.
2. Accessing the Water Pump
If the initial checks don’t resolve the issue, you’ll need to open the air cooler. Start by disconnecting the power cord from the wall outlet. Then, drain the water tank completely to prevent spills and facilitate access. Most air coolers have a drain plug at the bottom. Once drained, carefully remove the side panels or cooling pads. These are typically held in place by screws or clips. This will expose the internal components, including the water pump, which is usually located at the bottom of the water reservoir.
3. Inspecting and Cleaning the Pump
With the pump accessible, visually inspect it for any visible obstructions or debris. Look for hair, dust, mineral deposits, or other foreign objects that might be caught around the impeller. Gently remove any visible blockages. For more thorough cleaning, especially if mineral buildup is present, you can detach the pump. Use a small brush and mild soapy water to clean the impeller and pump housing. For stubborn mineral deposits, soak the pump in a solution of white vinegar for a few hours. This acidic solution helps dissolve hard water scale. After cleaning, rinse the pump thoroughly with clean water.
4. Checking Electrical Connections
Before reassembling, take a moment to examine the electrical wires connected to the pump. Look for any signs of fraying, cuts, or loose connections. Ensure that the wires are securely attached to the pump and any terminals on the cooler’s circuit board. Sometimes, simply pushing a loose connector back into place can resolve the problem. If the wiring appears damaged, it might require professional attention or replacement of the pump and its wiring harness.
When to Replace Your Air Cooler Water Pump (and How)
Despite your best troubleshooting and cleaning efforts, some water pumps are beyond repair. Here are the signs that indicate your pump likely needs a full replacement:
- No improvement after thorough cleaning: If the pump still fails to circulate water, hums without pumping, or shows no signs of life after being cleaned and having its electrical connections checked, it’s likely defunct.
- Burnt-out motor: A distinct burning smell or visible signs of scorching on the pump motor are clear indicators of a burnt-out unit, necessitating replacement.
- Severe physical damage: Cracks in the pump housing, a broken impeller, or compromised wiring that cannot be easily repaired mean the pump should be replaced.
If you’ve determined a replacement is needed, follow these steps:
1. Disconnect Power and Drain Water
As always, safety first. Ensure the cooler is unplugged and the water tank is completely drained.
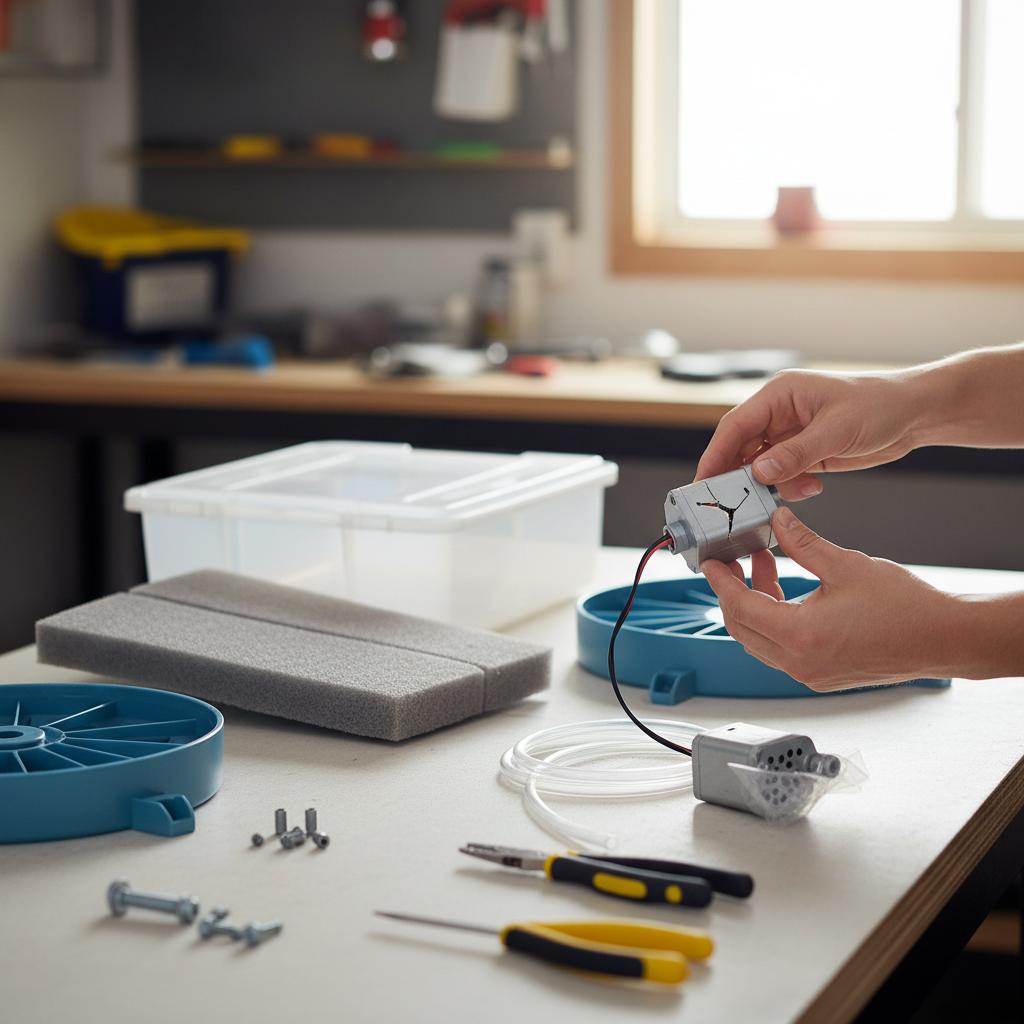
2. Locate and Remove the Old Pump
Access the pump by removing the cooler’s side panels and cooling pads as you did during the troubleshooting phase. Carefully unplug the pump’s electrical connector from the cooler’s main board or power supply. Then, disconnect the water hose(s) attached to the pump. You may need pliers to loosen any hose clamps. Finally, unfasten any brackets, clips, or zip ties holding the pump in place, and carefully lift the old pump out of the water reservoir.
3. Install the New Pump
Place your new air cooler water pump into the water reservoir. Some sources suggest placing the new pump inside a mesh filter bag to help prevent future scale buildup. Secure the new pump with its brackets or clips in the designated spot. Connect the water hose(s) to the new pump’s output nozzle, ensuring a tight fit. Reinstall any hose clamps if necessary. Finally, connect the new pump’s electrical wire to the appropriate terminal on the cooler’s circuit board, making sure the connection is secure. Use new zip ties if needed to keep the wiring tidy and out of the way.
4. Reassemble the Cooler
Once the new pump is securely installed and all connections are made, carefully replace the cooling pads and the side panels, securing them with their original screws or clips.
5. Test the New Pump
Before powering on, fill the water tank to the recommended level. Plug the air cooler back into the power outlet and turn it on. Observe the cooling pads to ensure water is now flowing evenly over them. Listen for any unusual noises. Your air cooler should now be producing cool, refreshing air once again.
Maintaining Your Air Cooler Water Pump for Longevity
To extend the life of your new (or newly repaired) water pump and prevent future issues, regular maintenance is key:
- Regular Cleaning: Make it a habit to clean the water tank and the pump regularly, ideally every few weeks during periods of heavy use. This prevents the buildup of mineral deposits and debris that can clog the impeller.
- Optimal Water Levels: Always ensure the water tank has sufficient water. Running the pump dry can cause it to overheat and fail prematurely.
- Seasonal Maintenance: Before storing your air cooler for the off-season, drain the tank completely, clean the pump and pads thoroughly, and allow all components to dry fully to prevent mold, mildew, and corrosion.
Conclusion
A broken water pump doesn’t have to spell the end for your air cooler. By systematically diagnosing common issues, performing simple cleaning and repair tasks, or confidently replacing the unit, you can restore your cooler’s efficiency and enjoy a comfortable indoor environment. Taking a proactive approach to maintenance, with regular cleaning and proper water management, will ensure your air cooler’s pump continues to function flawlessly for many seasons to come.
What steps will you take to keep your air cooler running smoothly this summer?
Frequently Asked Questions
How often should I clean my air cooler’s water pump?
It’s recommended to clean your air cooler’s water pump every 2-4 weeks during peak usage, or more frequently if you live in an area with hard water or high dust levels. Regular cleaning prevents mineral buildup and clogs.
Can I use tap water in my air cooler?
Yes, you can use tap water. However, if your tap water has high mineral content (hard water), it will lead to more frequent mineral buildup on the pump and cooling pads, requiring more regular cleaning and descaling.
What type of replacement pump do I need?
When replacing a pump, always try to find an exact match for your Air Cooler’s model. Check the old pump for a part number or specifications like voltage and flow rate. If an exact match isn’t available, choose a submersible pump with similar specifications.
Is it safe to repair the pump myself?
Many basic pump repairs, like cleaning obstructions, are safe for DIY. However, always ensure the cooler is unplugged. If the issue involves complex electrical wiring or internal motor components, it’s safer to consult a qualified technician to avoid potential hazards.
Why does my air cooler make a humming noise but no water flows?
This usually indicates that the pump motor is receiving power and trying to work, but the impeller is likely obstructed by dirt, debris, or mineral buildup. Disconnect power, access the pump, and thoroughly clean the impeller and pump housing.