Battling the summer heat often leads us to crank up our air conditioners, resulting in higher electricity bills. But what if you could enhance the cooling performance of your existing air cooler or even create a supplementary cooling device with a simple, cost-effective DIY ice box? You absolutely can! Harnessing the natural power of ice can significantly drop the air temperature, offering a refreshing blast when you need it most.
This comprehensive guide will walk you through understanding how ice boosts cooling, simple hacks for instant relief, and a step-by-step process to construct a dedicated ice box for sustained comfort. Prepare to transform your old air cooler into a more formidable ally against the heat.
Understanding Air Coolers and the Power of Ice
To truly appreciate the benefit of adding ice, let’s first quickly revisit how air coolers operate and then delve into the science behind ice cooling.
What is an Air Cooler?
|
Our Picks for the Best Air cooler in 2026
As an Amazon Associate I earn from qualifying purchases.
|
||
| Num | Product | Action |
|---|---|---|
| 1 | Arctic Air Pure Chill 2.0 Evaporative Air Cooler by Ontel - Powerful, Quiet, Lightweight and Portable Space Cooler with Hydro-Chill Technology For Bedroom, Office, Living Room & More,Blue |

|
| 2 | Midea 5,000 BTU EasyCool Small Window Air Conditioner - Cool up to 150 Sq. Ft. with Easy-to-Use Mechanical Controls and Reusable Filter, Perfect for Small Bedroom, Living Room, Home Office |
|
| 3 | DREO Evaporative Air Swamp Cooler, 43" Cooling Fans that Blow Cold Air 2026 Upgraded, 80° Oscillating Floor Fan for Bedroom, Easy Cleaning, APP Control, Ice Packs, 4 Speeds & 4 Modes, 12H Timer, White |
|
| 4 | Portable Air Conditioners, Swamp Cooler Portable AC Unit for Room, Windowless Cooling Fan That Blow Cold Air w/Remote 5L Tank 12 Speeds 9H Timer, Evaporative Air Cooler for Bedroom Garage (White) |
|
| 5 | 3-in-1 Portable Evaporative Air Cooler - 2000 CFM Swamp Cooler with 6.6-Gal Dual Tank & 4 Ice Packs, Remote Control, 12H Timer, Oscillating Cooling Fan for Large Room, Office, Mother's Day |
|
| 6 | Portable Air Conditioners, 3-IN-1 Evaporative Air Cooler,Cooling Fans that Blow Cold Air with 60° Oscillation,9H Timer,3 Modes & 12 Speeds, 8 Ice Packs, Windowless Portable AC for Room,Bedroom,Office |
|
| 7 | DREO Tower Fan for Bedroom, 2026 Upgraded DC Motor, 28ft/s High Velocity, 20dB Ultra Quiet Standing Fan, 8 Speeds 4 Modes, 90° Oscillating Bladeless Fan for Indoors, Floor Fans with Remote, Black |
|
| 8 | LEVOIT Tower Fan for Bedroom, 90° Oscillating Standing Fan with 28dB Quiet for Sleep, 25ft/s Velocity, 12H Timer, 5 Speeds 4 Modes, Remoter, Bladeless Room Fan for Home, Office, Indoor, 36 inch, White |
|
| 9 | Evaporative Air Cooler - Swamp Cooler with 3L Water Tank, 3 Modes & 3 Speeds, Remote Control, 12H Timer, 50° Oscillating Portable Bladeless Cooling Tower Fan For Room Bedroom Office Mother's Day |
|
| 10 | DREO Tower Fan for Bedroom, 43" Cooling Fans That Blow Cold Air 2026 Upgraded, Evaporative Air Cooler, Quiet 80° Oscillating Floor Fan, Easy Cleaning, APP Control, 4 Modes & 4 Speeds, 12H Timer, Black |
|
An air cooler, often referred to as an evaporative cooler or swamp cooler, works on the principle of evaporative cooling. It draws in warm, dry air, passes it over water-soaked cooling pads, and as the water evaporates, it absorbs heat from the air, thus lowering the air temperature. A fan then blows this cooled, humidified air into the room. Unlike traditional air conditioners, air coolers do not use refrigerants, making them a more eco-friendly and energy-efficient option. They perform best in dry climates where the air can readily absorb moisture.
The Science Behind Ice Cooling
The magic of ice in cooling lies in its ability to absorb a significant amount of heat as it transitions from a solid state (ice) to a liquid state (water) without changing temperature. This is known as the latent heat of fusion. When you add ice to an air cooler’s water reservoir or create an ice box, the air passing over or through the ice-chilled water drops in temperature more rapidly. This pre-cooled water then saturates the cooling pads, leading to the fan circulating significantly colder air into your space. It’s a simple yet highly effective way to amplify the cooler’s performance, especially on those exceptionally hot days.
Simple Hacks to Supercharge Your Air Cooler with Ice
You don’t always need a complex setup to benefit from ice. Sometimes, the quickest solutions are the most effective for a temporary boost.
Direct Ice Addition
The easiest way to enhance your air cooler’s performance is by adding ice directly into its water tank. This immediately chills the water that flows over the cooling pads.
- Ice Cubes/Blocks: Simply drop a handful of ice cubes or a larger block of ice into the cooler’s water reservoir. Large ice blocks or frozen water bottles tend to melt slower than smaller cubes, providing a more consistent and prolonged cooling effect.
- Frozen Water Bottles or Ice Packs: Instead of direct ice, which can dilute the water, consider freezing plastic water bottles or using reusable ice packs. These can be placed directly into the water tank. They are easy to remove and refreeze, and they prevent any potential strain on the water pump from excessively cold water or stray ice.
- Ice in a Mesh Bag: If your cooler lacks a dedicated ice compartment, placing ice cubes in a mesh bag or a cloth pouch before putting them in the water tank can be beneficial. This allows the ice to cool the water without directly mixing, and it’s easier to remove the melted remnants.
Caution: While adding ice is effective, avoid overfilling the tank or placing so much ice that it obstructs the water pump or the water circulation system. Also, ensure the ice doesn’t block the pads’ water flow.
The “Ice Bowl & Fan” Method (as a Supplement)
For a quick, localized cooling effect, especially if your air cooler doesn’t have an easily accessible water tank for ice, a simple ice bowl and fan setup can be a great temporary supplement.
- How it Works: Place a large bowl filled with ice (a metal or glass bowl retains cold better) directly in front of your air cooler’s air intake or air outlet. As the cooler draws air past the ice or blows air over the ice, the air temperature drops significantly.
- Materials: A sturdy fan (even a small box or desk fan will do), a large metal or glass bowl, and plenty of ice cubes or a large block of ice.
- Benefits: This method is incredibly easy to set up, provides immediate relief, and is perfect for targeting specific areas. It’s an excellent stop-gap measure or a boost for an existing cooler on the hottest days.
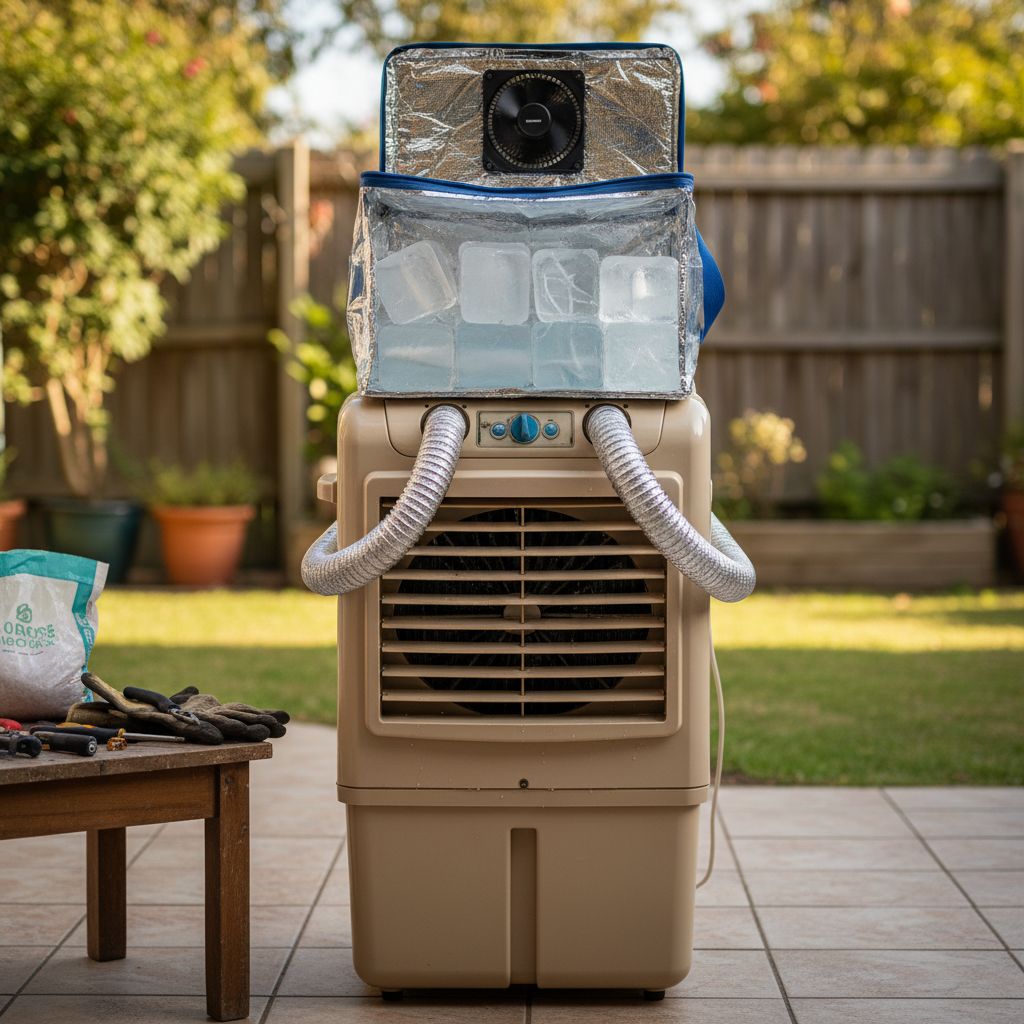
Building a Dedicated DIY Ice Box for Enhanced Air Cooling
For those seeking a more robust and sustained cooling enhancement, constructing a dedicated DIY ice box to work in tandem with your air cooler (or even as a standalone unit) is an excellent project. This approach allows for greater ice capacity and more directed cold airflow.
Is an External Ice Box for Your Air Cooler Right for You?
An external ice box is ideal if your current air cooler lacks a dedicated ice compartment, you need a more intense cooling blast than simply adding ice to the tank provides, or you want a portable, supplemental cooling solution. It’s crucial to understand that while highly effective for localized cooling, this DIY project is not a substitute for a full-fledged air conditioning system.
Materials You’ll Need:
Before you begin, gather these essential items:
- Insulated Cooler/Ice Chest: A Styrofoam cooler or a hard-sided plastic cooler/ice chest. The better the insulation, the longer your ice will last.
- Small Fan: A 12V DC computer fan (80mm to 140mm depending on cooler size), a small exhaust fan, or a compact box fan. Choose one with decent airflow.
- PVC Pipes: Two to three sections of PVC pipe (around 2-3 inches in diameter) with elbow connectors, depending on how many air outlets you desire.
- Tools:
- Drill and appropriate hole saw bits (matching your fan and PVC pipe diameters).
- Utility knife or box cutter.
- Hot glue gun with glue sticks (for sealing).
- Measuring tape or ruler, marker.
- Ice Supply: Plenty of ice cubes, large ice blocks, or frozen plastic bottles/ice packs.
- Optional Enhancements:
- Fan speed controller (for 12V fans).
- Mesh bag for ice.
- Small drainage spigot for melted water (if your cooler doesn’t have one).
Step-by-Step Construction Guide:
Follow these steps carefully to build your DIY ice box:
- Step 1: Prepare the Cooler
- Clean the cooler thoroughly and ensure it’s dry.
- On the lid or a side (depending on your fan type and where you want air to be drawn in), mark the outline for your fan opening.
- On an opposite side or the front of the cooler, mark the positions for your PVC pipe outlets. Aim for these openings to be above where the ice will sit but below the fan intake, to ensure air passes over the ice.
- Step 2: Cut Openings
- Using your drill and hole saw, carefully cut out the circular openings for the fan and the PVC pipes. If using a utility knife, take your time and make precise cuts. Ensure the holes are snug for a good seal.
- Step 3: Install Fan and Pipes
- Insert the fan into its designated opening. Secure it firmly with screws or hot glue, ensuring an airtight seal around the edges. Position the fan to blow air into the ice box, forcing it over the ice.
- Insert the PVC pipe sections into their holes. Attach elbow connectors if you want to direct the airflow. Use hot glue to seal all gaps around the pipes, preventing air leakage.
- Step 4: Power the Fan
- Connect your fan to its power source. For 12V computer fans, this might involve a 12V adapter or a portable battery pack. If using a speed controller, integrate it into the wiring. Always prioritize electrical safety.
- Step 5: Load with Ice
- Fill the bottom of your newly constructed ice box with a generous amount of ice. For optimal performance and longevity, use large ice blocks or frozen water bottles/ice packs. These melt slower and provide a more consistent cold.
Optimizing Your DIY Ice Box:
- Ice Type: Large blocks or frozen bottles are superior to small cubes for extended cooling.
- Salt Addition: Some DIY enthusiasts suggest adding a small amount of salt to your ice can slightly lower its freezing point, potentially making the air even colder. However, this may also cause the ice to melt faster, so test what works best for your setup.
- Sealing: Ensure all cuts and installations are as airtight as possible to maximize the insulation provided by the cooler and prolong ice life.
- Drainage: If your cooler doesn’t have a drain, regularly empty the melted water to prevent overflow.
Using and Maintaining Your Ice-Enhanced Air Cooler
Proper usage and maintenance are key to getting the most out of your DIY ice box and ensuring its longevity.
Placement and Ventilation
- Strategic Positioning: Place your ice box or enhanced air cooler in a position where its cold airflow can effectively reach your desired area. For an integrated solution, ensure the cooler itself has sufficient space around it for good air intake.
- Ventilation for Air Coolers: If using an air cooler, remember it works best with good ventilation. Opening a window or door slightly allows humid air to escape and fresh, drier air to be drawn in, which improves the cooler’s efficiency.
Monitoring and Refilling
- Regular Checks: Ice melts, so you’ll need to monitor the ice levels. Depending on the ambient temperature, the amount of ice, and the insulation, ice can last anywhere from 1 to 4 hours. Keep a supply of extra ice ready for replenishment.
- Water Management: If your ice box isn’t integrated into the air cooler’s water tank, be mindful of the melted water. You’ll need to drain it periodically to prevent spills and keep the unit functioning optimally.
Cleaning and Storage
- Routine Cleaning: Regularly clean your DIY ice box or air cooler’s water tank and components. Melted ice water can lead to mold or mildew growth, especially in stagnant areas. Disassemble parts if necessary for thorough cleaning with mild soap and water.
- Proper Storage: When not in use, especially during off-seasons, clean and dry all components completely before storing them in a cool, dry place to prevent damage and microbial growth.
Pros and Cons of a DIY Ice Box Air Cooler
Like any cooling solution, a DIY ice box comes with its own set of advantages and disadvantages.
Advantages:
- Cost-Effective Boost: Significantly cheaper than buying a new air conditioner or even a higher-end air cooler.
- Eco-Friendly: Uses only ice and a low-power fan, consuming far less electricity than traditional AC units.
- Portable: Most DIY ice boxes are relatively compact and can be easily moved to different rooms or even used outdoors.
- DIY Satisfaction: The rewarding feeling of building a functional cooling device yourself.
- No Refrigerants: Avoids the use of chemical refrigerants found in ACs.
Disadvantages:
- Limited Cooling Capacity: Best suited for small rooms or personal spaces, not entire homes.
- Short-Lived Effect: Ice melts, requiring frequent replenishment, which can be inconvenient.
- Increases Humidity: As ice melts and water evaporates, it adds moisture to the air. While beneficial in dry climates, this can make already humid environments feel muggier.
- Condensation Management: Condensation can form on the outside of the ice box, requiring towels or drip trays to manage.
- Not a True AC Replacement: Provides temporary relief but cannot match the consistent, powerful cooling of a dedicated air conditioning system.
Conclusion
The quest for a cooler, more comfortable home during stifling summers doesn’t always have to break the bank. By understanding the principles of evaporative cooling and the simple physics of ice, you can effectively boost the performance of your existing air cooler or construct a dedicated DIY ice box. Whether you opt for a simple hack like adding frozen bottles to your water tank or embark on building a custom ice chest cooler, these methods offer a cost-effective and energy-efficient way to combat the heat. While no DIY solution can entirely replace a traditional air conditioner, the enhanced cool air provided by these ice-powered innovations can make a significant difference in your comfort. So, why not give these DIY projects a try and experience a refreshing chill this summer? How will you personalize your ice-powered cooling solution?